The Hollow: Part 2
The Hollow position is probably the more well known position and the one that is focused on the most when developing core strength and well it’s the position that actually creates and gets you above that bar. But we want efficiency. And that means maintaining the tension as we transition from the Arch to the Hollow. Again, arms and legs are fully extended and knees and ankles are squeezed tight with toes pointed. Ideally in this position on the ground, one could push down on your toes and your top half would lift, moving as one shape, not breaking at any point.
Many athletes lose this shape by swinging the legs upward into a piked position, losing lat engagement when the shoulder angle closes or trying to thrust the hips toward the bar thus creating an arch again rather than maintaining the hollow position.
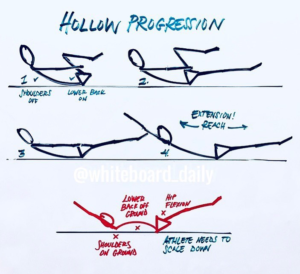
Again, practicing on the ground is a great first step. Whiteboard Daily has a great diagram of progressions (see above) that you can use to build up your strength and stamina in these positions. The key is to keep the core tight by keeping back into the floor. Once you have progressed to the full hollow hold position, hollow rocks are a great way to practice maintaining that tension. Want to take it up another notch? Grab a PVC pipe to simulate holding onto the rig and practice POPPING into that position as quickly as possible.
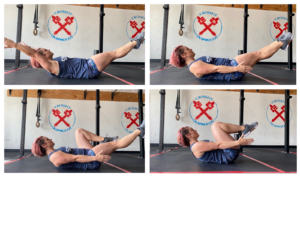
In PART THREE, I will be discussing putting the two of these together and how they should be achieved when actually performing specific gymnastics movements such as the pullup, toes to bar and the muscle up. In the meantime, here is an exercise you can do to build up your stamina in these positions as well as drilling a FAST and EFFICIENT transition between the two. It’s called the LOG ROLL, and I first discovered it on BreakingMuscle.com:
This exercise is almost exactly what it sounds like. The difference is that while you’re rolling from your stomach to your back, you will be alternating between the arch and hollow, respectively. Start by finding your hollow position. Then roll left or right, transitioning into your arch position. Once in the arch position roll back left or right transitioning back into your hollow position. The goal is to be able to snap from one position to the other .
Minimize excess movement outside of the hollow and arch as much as possible. Your legs should remain glued together and you should continuously squeeze your glutes, abs, and quads throughout the movement.
Want another challenging option? Check out the Hollow Arch Pulls at the bottom of the same article by clicking HERE !
Next time you have a few minutes before class or after, try some of these out! If you are looking for more in depth advice or training progressions, be sure to ask one of our amazing coaches or set up a personal training session. If you are not a member, but are curious about CrossFit or learning any of these movements, be sure to check out our KICKSTART PROGRAMS .
AUTHOR’S NOTE: As you might have noticed I LOVE WHITEBOARD DAILY (@whiteboard_daily) for quick and easy visual explanations. If you aren’t already following them on IG or FB you should be. Some other great gymnastics accounts related to CrossFit to follow are: @thegymnasticscourse @pamelagnon @performanceplusprogram @thebarbellphysio @functional.gymnastics
Photo credits:
Diagram: @whiteboard_daily
Photo: @crossfitdunwoody
The post The Hollow: Part 2 appeared first on CrossFit Dunwoody.


