Re(building) Your Foundation: Strict Strength
By: Coach Amber Hopeman (@eat.train.mom)
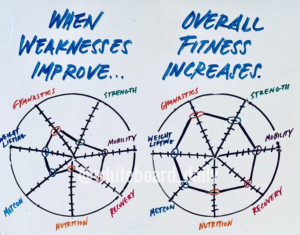
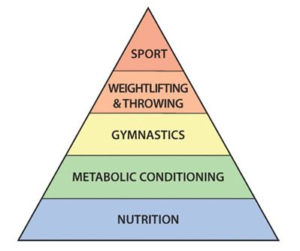
Over the coming weeks, our blog posts are going to be focused on gymnastics. We are going to talk shapes, kipping, efficient transitions, etc… But before we get into dynamic movement let’s take a step back. First off, why focus on gymnastics first? Because fundamentally, the stronger, more efficient we are in gymnastics, the stronger and more efficient we will be in weightlifting and our sports.
Gymnastics (especially the movements that involve hanging from the rig) requires:
- Body awareness akin to Spiderman
- A strong core
- Grip strength
- Shoulder stability
- Strong and engaged Lats
Given these requirements, as a coach, if an athlete comes to me and wants to learn how to kip, my first question is simple: How many STRICT Pull-ups can you do? Why? Because the number of strict pull ups you can do and by observing you do them, this is going to tell me just how engaged your lats, stable your shoulders and how strong your grip and core are. And more importantly, it will tell me if you are even ready. As a coach, my job is to help you with technique, sure, but my goal is to get you there safely and to not skip steps that could lead to injury or a set back in your progress.
So if you are determined to learn how to do a kipping pull-up, the following should be your mantra every time you step into the gym to work on them:
KIPPING IS NOT A SCALE
It is a progression in gymnastics that you develop AFTER you have built the appropriate strength to perform kipping movements safely and with control. So if we need to we can develop a plan to either focus on building strict strength or really dial in your kip if you are ready. But remember, (I will say this many times over the next few posts so you won’t be able to forget it), YOU WILL NOT GET BETTER AT DOING PULL UPS BY DOING MORE PULL UPS.
So whether you are looking to PR your Fran time or you are wanting to get your first kipping pull-up, consider what is going to get you there. Building/improving strict strength is the first step and can be accomplished many ways. Banded Pull-ups and Ring Rows are the go-tos, and are normally the typical modification for MetCons. However, I want to focus on movements you can do at home, or maybe for 10-15 minutes after class where you can focus on your form, not for time but for quality.
LEVEL 1- STATIC CHIN OVER BAR HOLDS
Simple yet challenging all the same. Start with your chin over the bar and just “hang out” (pun intended). Looking to accumulate as much time as possible. Start with three sets at 10 seconds then increase the duration when you are able to do all three sets. Work up to three sets at 60 seconds.
Focus on maintaining strong
 hollow position, legs straight, feet and knees together. (We will talk more about the hollow position over the next few weeks.) If you can’t hold your body weight over the bar just yet, it is okay to use a band or even to put your toes (or toe) on a box for slight support.
This movement will provide:
- Increased grip strength
- Improved core strength and breath control under tension
- Increased lat strength
LEVEL 2- THE NEGATIVE
Whether you perform this movement on the rig or with the rings, the idea is the same: begin at the top either by jumping or stepping up to get chin above the bar or pulling rings to chest. At this point, the shoulders should still be drawn down and back, lats engaged and back of neck and head nice and long. From the rig you should have a nice hollow position with abs turned on and legs straight and glued together. From the rings, same position, hollow body (we will talk more of the shapes in the next few weeks), rings to chest, elbow back, shoulder blades squeezed together.
The negative is simple, from this top position, you are going to lower down as slowly as possible until your elbows reach full extension but try to not let lats or shoulders disengage. Your neck should be relaxed. You can test this by moving your head side to side as you descend. If you cannot lower all the way down slowly, use a box to support your weight slightly so that you can descend to full range of motion.
This movement will provide:
- Increased lat strength and stamina
- Increased body awareness as you try to remain engaged and get used to knowing what that feels like under tension, relaxing that neck while still engaging the core and shoulders
- Improved grip strength as you are able to lower down even slower
LEVEL 3: SINGLE ARM RING ROW
The normal (bilateral) ring row is a great way to build pull-up strength. However, the single arm row is a great unilateral exercise to identify and improve strength imbalances. If your progression or strength bilaterally has plateaued its possible this is the culprit. If you can accomplish significantly more rows on one arm than the other you may not be seeing progress because right now you are literally using just one arm to pull. This could be a strength or activation issue on the weaker side.
My recommendation would be to conduct the following test: After warming up, find a body angle at which you believe you believe can perform 10 unbroken single arm ring rows with your dominant arm. Then attempt to accomplish 10 on both. Make sure you use the same stance and place the feet in the exact same position for both sides. SEE VIDEO HERE
For practice purposes a good rep scheme would be 3 x 6-8 reps with a Slower Down, Faster Up Tempo. If you determined one side was weaker than the other, conduct a 4th set on that side.
This movement will provide:
- Increased grip strength
- Improved body awareness
- Improved and more balanced lat activation
- Improved unilateral Strength and stability of shoulders
- Increased core activation
Next time you have a few minutes before class or after, try some of these out! If you are looking for more in depth advice or training progressions, be sure to ask one of our amazing coaches or set up a personal training session. If you are not a member, but are curious about CrossFit or learning any of these movements, be sure to check out our KICKSTART PROGRAMS.
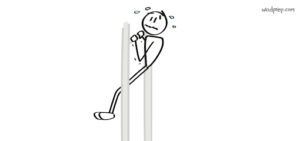
AUTHOR’S NOTE: I LOVE WHITEBOARD DAILY (@whiteboard_daily) for quick and easy visual explanations. If you aren’t already following them on IG or FB you should be. Some other great gymnastics accounts related to CrossFit to follow are: @thegymnasticscourse @pamelagnon @performanceplusprogram @thebarbellphysio @functional.gymnastics
Photo credit:
Diagram: wodprep.com
The post Re(building) Your Foundation: Strict Strength appeared first on CrossFit Dunwoody.